I admit that I did not read a lot of webcomics before starting Week Cartoons. Now I do, a lot. Mostly I read comedy, and other gag webcomics similar to mine. Some of the other artists are internet acquaintances, and maybe one day I can call them friends. Their work makes me laugh and inspires me to keep going with this project, and sometimes I make guest comics for them to play with their styles and to connect in a meaningful way.
I always drew by hand. In order to make a webcomic, I had to learn how to digitize my drawings. I knew nothing about that before starting Things in Squares. Never took graphic design courses, have only ever made stick figures with Paint. This article is one of those retro ones I warned you about. I’m going to describe the creation process exactly.
Tools to make this webcomic
To make Things in Squares comics, I use these materials for the hand drawing:
- Plain white printer paper
- Staedtler pinpoint black pens 0.1 and 0.5
- HB or 2B pencil
- Gum eraser

Sometimes I print out and use templates that already have the comic frames, like this:

To digitize my line drawings, I use these tools:
- Digital camera
- Scanner
- Photoshop CS6
Scanning or photographing the line drawing
I’ve found that a good scanner is hard to come by if you travel as much as I do. It’s not practical for me to own a scanner. As a traveler, though, I have a nice digital camera. I always make sure not to use flash, since it creates a sheen that can dim the lines. Better to upload a dark picture than a whitewashed one.
Editing the line drawing in Photoshop
Once I have my file, I place it in its own folder and open it in Photoshop. I’ve also used Gimp, but if I had to choose I’d go with Photoshop. Thanks to Things in Squares I’ve learned a lot about this software. I still don’t have the crispest line drawings after all the steps I’m about to explain, but it is an ongoing adventure to improve their quality. For now, I’ll explain what I do with a photo of a line drawing to get it looking nice.
Step 1: B/W Mode
Before anything, strip the color from the image. Navigate to:
Image > Mode > Grayscale
Click ‘Discard’.
Step 2: Exposure
The image will probably be dark. It doesn’t matter if you don’t have good light when you take the photo, as long as it’s not blurry and as long as the light that is available falls on the paper uniformly. Navigate to:
Image > Adjustments > Exposure
Tilt your computer so you can see all the shade as it disappears, slowly increasing the exposure. If your are over-exposing parts of the image, then use the Lasso tool to select only the areas that need increased exposure.
Step 3: Noise
Sometimes this step is unnecessary, you’ll have to be the judge. Navigate to:
Filter > Noise > Dust and Scratches
Make sure the radius is only 1px and click OK. The preview is always exaggerated as you’ll see. Within “Noise” you’ll also see “Despeckle” and “Reduce Noise”. You can play around with these, but I found that they’re redundant.
Step 4: Levels (or curves)
This step is meant to darken the lines. Navigate to:
Image > Adjustments > Levels (or curves)
Below the graph, drag the arrow slider on the far left toward the right. Watch how your lines darken and stop before they’re too sharp. “Curves” does something similar.
If you look at some of my early comics, you’ll see that the lines are too dark, with too-sharp edges that look pixelated. Go easy on the levels.
Step 5: Cropping/Rotation
Finally, your image may not be straight. There are two ways to rotate the image. First, you can use the Select tool, select the entire image, click CTRL+T, and then hover the cursor outside of the image at a corner, then click and hold to rotate. Alternatively, navigate to:
Image > Image Rotation > Arbitrary
Enter the degrees of rotation and click OK.
To Crop, either click the Crop tool directly, and resize the image by dragging from the sides and corners, or use the select tool to select the crop frame, then click the Crop tool, then ‘return’ on your keyboard.

A brief note on Photoshop tools. There’s a simple function that no one teaches you. If you right-click on a tool, you’ll see a list of other tools that it can change into. So if you right click the “magic wand tool”, you can replace that slot with the “quick selection tool”. Took me ages to figure this easy bit out.
Using layers in Photoshop
For novices to Photoshop, understanding layers is one of the fundamental steps to creating anything with the software. Layers are what they sound like. Layers are stacked on top of each other. You can do a lot with layers, including erasing space to render it transparent through to the next layer underneath. You can also change the opacity of a layer, so that if you have a picture of a dog on the base layer, then a totally blue layer on top of that, then by changing the opacity of the blue layer to say 15%, you essentially create a blue photo filter over the dog. Follow me? See the layers in Photoshop on the bottom right of the screen:

Each layer has a check box, a thumbnail, and a name. The thumbnail shows a mini summary of what that layer contains. The white/gray checkered design always signifies that the space is transparent. The check box, when clicked, has an eye appear in it, as you can see in the picture above. This means that layer is visible in the image. Un-click the eye and that layer is taken out. Here’s the exact same Photoshop image from above, but I’ve un-clicked all the layers, so their content is stripped from the big image you see in the main window:

The only layer that remains selected is named “Background copy”. This layer is the original line drawing, as I described in the previous section.
Making the white space transparent
So, if you start with a black and white line drawing, how can you place color over the white but under the black? To do this, follow these steps exactly.
Step 1: Recognize that your image begins as one single layer (you don’t do anything in this step.)

Step 2: Duplicate the initial layer
Right-click on the layer, and select “Duplicate Layer”. The reason you do this is because the base layer of your image is usually locked. You do not see a locked image in these screenshots because I delete it. Don’t delete it, just follow the next step.
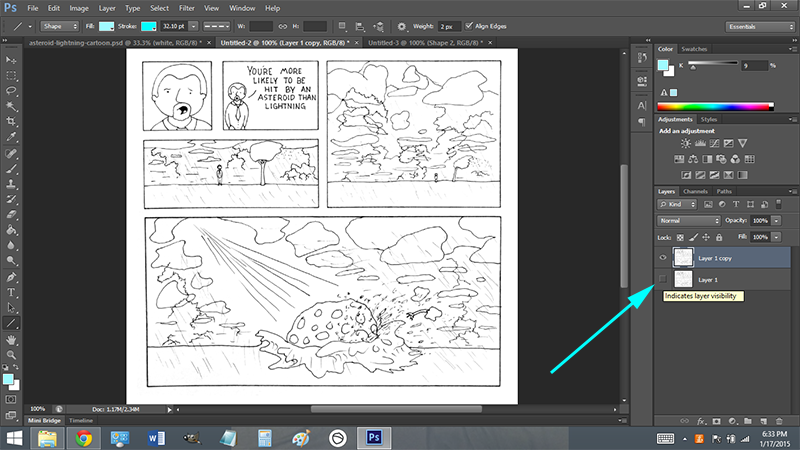
Step 3: Hide the bottom layer
Un-click the eye in the check box of the bottom layer to hide it. Like so:
Step 4: Create a new layer
Create a new layer by clicking the icon in the bottom right of the panel sidebar that looks like a piece of paper with its bottom left corner bent. It looks like this:

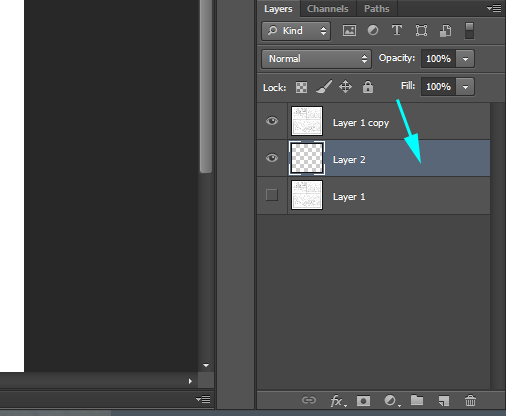
Step 5: Demote the new layer
Click and drag the layer you just created beneath the visible layer of your comic (layer 1 copy). Know that the content within layers toward the top of the list will appear over the layers below it.
Step 6: Make the white space transparent
Now comes the clincher. You can change the mode of a layer. One of these optional modes makes all white content within that layer transparent. This does not only include pure white, but any white within other colors. The black of a line drawing will remain, superseding all content in the layers below. Select the line drawing layer (in the screenshots this is ‘layer 1 copy’). It’s selected when it’s highlighted:

Now click the drop-down menu that says ‘normal’ to change the layer’s mode. Click ‘multiply’:
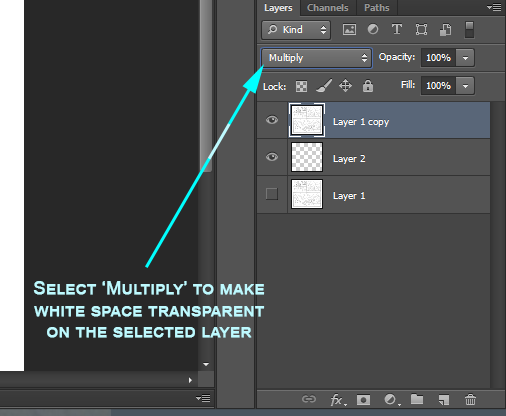
Now the white space is transparent! Select the next layer down, the new one that you’d created. Remember that the white/gray checker pattern indicates that it’s transparent, or empty. Click this layer, choose a color (if your image is still in Grayscale mode, navigated to Image > Mode > RGB and click ‘don’t merge’ when it prompts you). Use the brush tool to color the image:
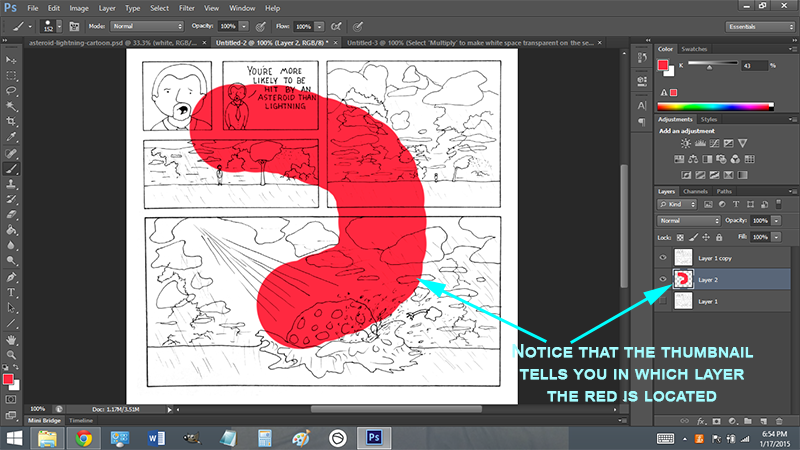
Now you can go crazy with colors!
Coloring the comic
To color the webcomic, it’s best to use a lot of layers. This makes everything easier to edit. Try to use one layer per color or object (like a layer dedicated to one item or one character). If you later want to use shadow, make a dedicated layer for shadow too. To make new layers, remember to click the little paper icon at the bottom right of the screen.
At first, coloring my webcomics was tedious business. Now it goes by a little faster. Let me explain to you what I do, and maybe you’ll adopt the techniques.
Selecting spaces
Instead of coloring everything in using the Zoom tool to get close to the lines so as not to go outside of them, it’s better to select the area you want to color. There are a number of select tools. There’s the main select tool, which selects areas within a box or rectangle. There’s the lasso tool which is used to select an area by hand. Then there’s the magic wand. This is the tool I use. Here it is:

If you don’t see it, right click the icon that’s taking it’s slot, find the wand in the popup, and click it.
To select an area of a line drawing with the magic wand tool, you must first select the layer that contains your black and white drawing. The wand works like this. Bring your cursor over an area of your image that is fully enclosed by black lines. Click. You will see that enclosed area selected. Example, I clicked the guy’s face:
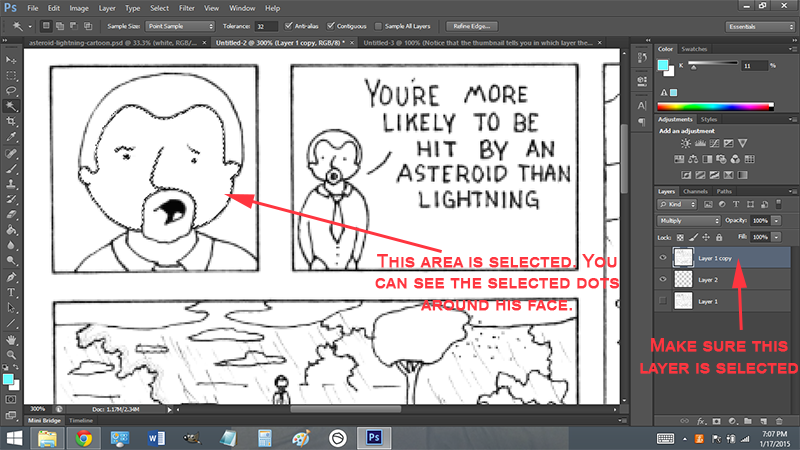
Sometimes the selection does not reach all the way to the black lines, so you’ll want to expand your selection by one or two pixels. I generally choose 2 pixels so that I don’t have return and fill in white where the wand’s selection had fallen short. To expand the selection, navigate to:
Select > Modify > Expand
Choose 2px and click OK.
Once you have your selection, you can color it in. But wait! With the area selected correctly, now you must switch back to the layer on which you want the color to go. Select the layer, then use the Brush tool to color in the selected area. This is the process that you will repeat over and over again until your comic is fully colored in.
Later, maybe I’ll write about other techniques that employ some of those I’ve written about here to create totally different effects efficiently. But for now, this post has come to an end, you have everything you need to know about making a line drawing into a webcomic.
Click here to sign up for Photoshop CC


I’ve been using Photoshop for years to draw comic-like pictures, but somehow I never had the idea to use the multiply filter for it… Thanks for the hint 😉
Glad that this post has helped Roland!
This post is really helpful! Thank you for giving a step-by-step process on how to use layers for colouring effectively. This was exactly what I was looking for. 🙂
Glad it could help!
You deserve a cookie, unless you’re allergic. Would you read my webcomic when i make one??